

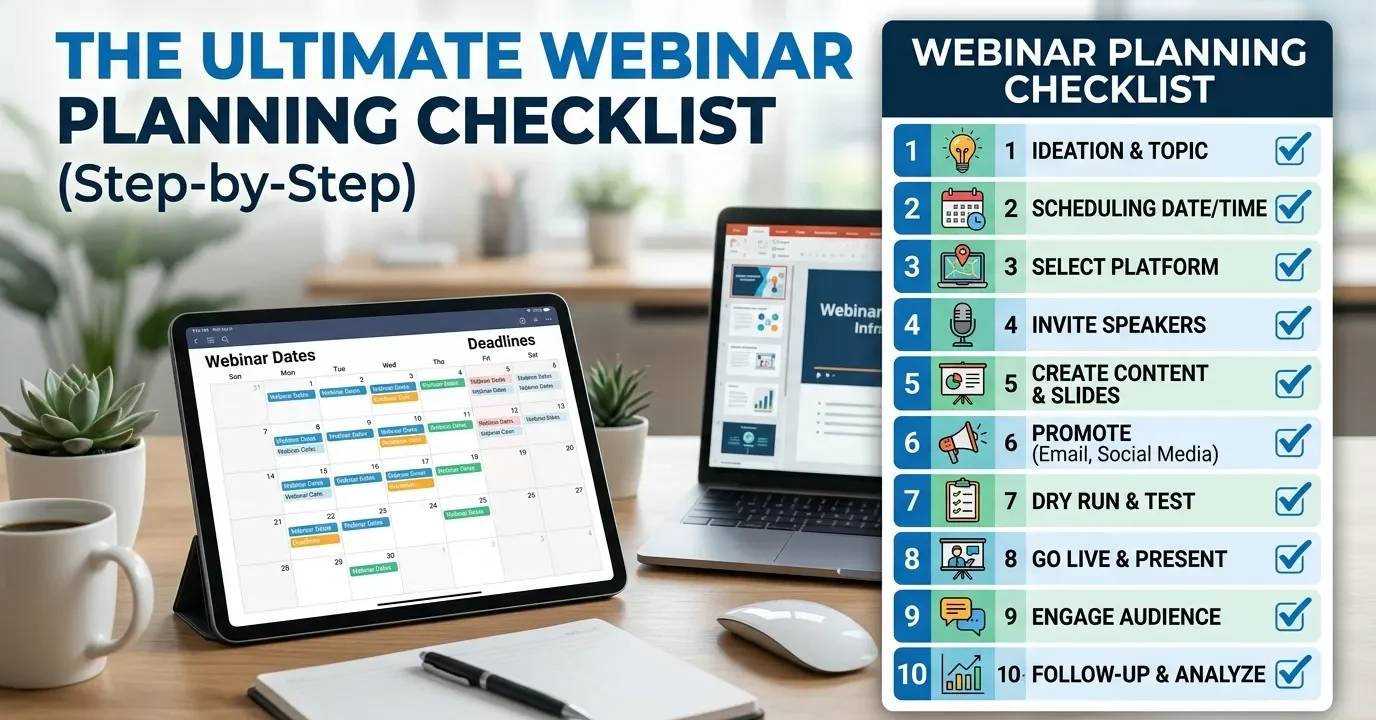
A webinar planning checklist helps you organize every stage of a successful webinar, from setting goals and choosing the right platform to promoting the event, delivering an engaging presentation, and following up with attendees. By following a structured process, you can improve attendance, increase engagement, and achieve better results from every webinar.
A successful webinar requires planning across four key phases: pre-event strategy, technical setup, marketing and promotion, and live delivery. This webinar planning checklist walks you through each stage—from setting goals and choosing a platform to post-event follow-up—so nothing falls through the cracks.
Webinars consistently rank among the highest-converting content formats available to marketers and educators. According to ON24’s 2023 Webinar Benchmarks Report, the average webinar generates 295 registrations and converts at around 56%—figures most content channels can’t match. Yet despite their potential, poorly planned webinars are a common and costly mistake.
A laggy stream, a presenter who runs over time, or a promotional campaign that starts too late can quickly undo months of preparation. The difference between a webinar that drives results and one that frustrates attendees usually comes down to following a structured webinar planning checklist.
This guide provides a complete webinar planning checklist, broken into clear phases, so you can approach every virtual event with confidence. Whether you’re hosting your first online seminar or streamlining a recurring series, these practical steps will help you plan, promote, and deliver a webinar that achieves your goals.
Phase 1: Webinar Strategy and Goal Setting
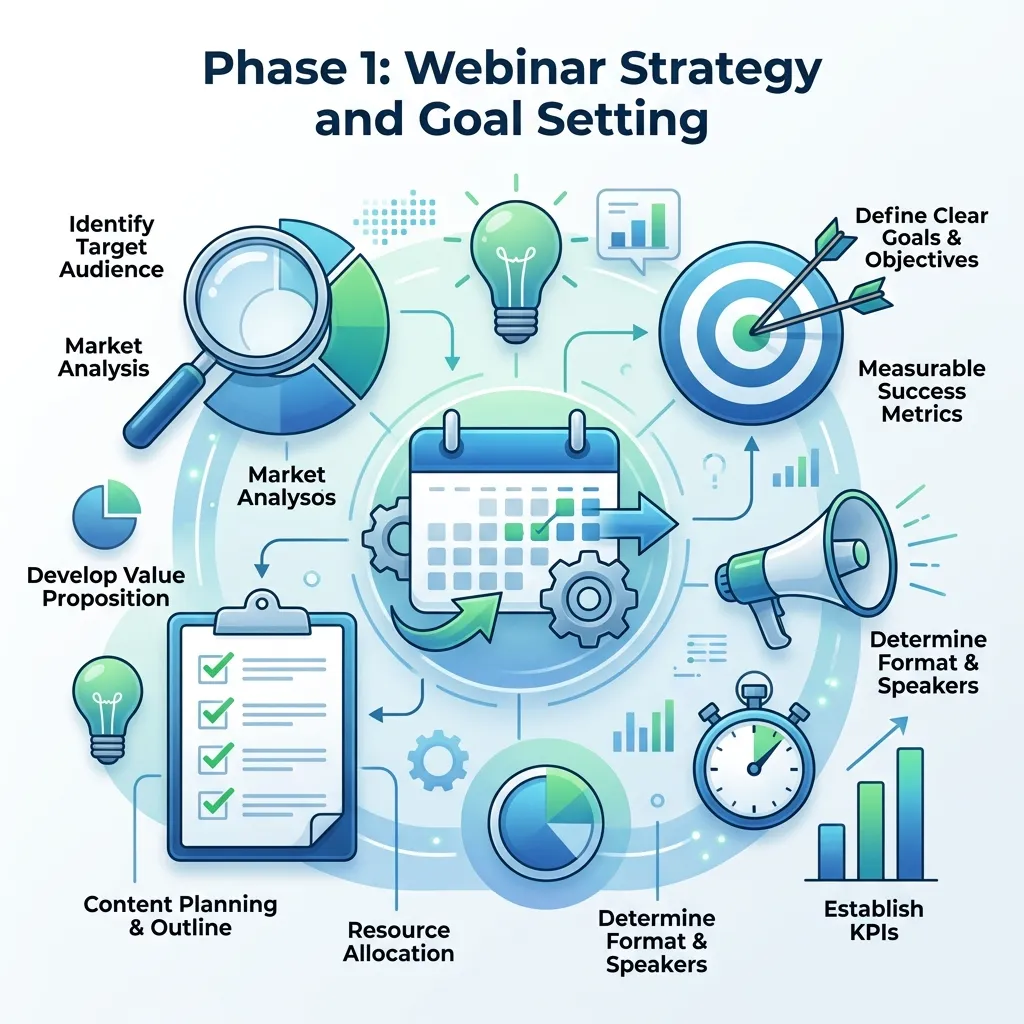
Before booking a speaker or choosing a platform, you need a clear strategic foundation. Skipping this step is one of the most common reasons webinars underperform.
Start by defining what success looks like. If you’re unsure where to begin, establish clear webinar marketing goals and strategy before planning your content or promotions.
What are the goals of your webinar?
Start by defining what success looks like. Are you generating leads, nurturing existing prospects, educating customers, or building brand authority? Your goal will shape every other decision—from topic selection to how you structure the follow-up.
Set specific, measurable targets. For example: “Generate 200 qualified registrations” or “Achieve a 40% live attendance rate.” These benchmarks give you something concrete to evaluate after the event.
How do you choose the right webinar topic?
Your topic needs to sit at the intersection of what your audience wants to learn and what your brand is credible to teach. A few approaches that work well:
- Mine your support tickets and sales calls for recurring questions your audience is already asking.
- Analyze your top-performing content to identify themes that already resonate.
- Survey your email list with a simple two-question poll about their biggest current challenges.
Once you have a topic, sharpen it. “Marketing tips” is weak. “How to cut your paid ad spend by 30% without losing leads” is compelling. Specificity drives registrations.
Who is your target audience for the webinar?

Define your ideal attendee in detail. Job title, industry, level of experience, and what problem they’re trying to solve. This profile directly informs your messaging, your choice of speaker, and which channels you’ll use to promote the event.
Phase 2: Technical Setup Checklist for Webinars
Technical failures are the fastest way to lose an audience. A solid setup phase eliminates most of them before they happen.
Which webinar platform should you use?
The right platform depends on your audience size, budget, and feature requirements. Here’s a quick breakdown:
- Zoom Webinars: Best for teams already using Zoom; supports up to 10,000 attendees with Q&A, polls, and recording.
- Demio: Purpose-built for marketers; strong automation and analytics features.
- GoTo Webinar: Reliable for enterprise teams with large audiences and detailed reporting needs.
- Livestorm: Browser-based (no download required), which reduces friction for attendees.
Choose your platform at least three to four weeks before the event date. This gives you time to configure settings, run test sessions, and train co-hosts or panelists.
Webinar tech setup checklist
Run through this list before every event:
- Platform account created and plan confirmed
- Registration page built with form fields and confirmation email set up
- Presenter and panelist links sent and tested
- Camera, microphone, and lighting tested
- Backup internet connection available (mobile hotspot)
- Screen sharing and presentation slides tested
- Polls, Q&A, and chat features configured
- Recording enabled and storage location confirmed
- Waiting room or lobby configured
- Tech rehearsal scheduled with all speakers
Run a full dry run at least 48 hours before the live event. This catches issues early enough to fix them.
Phase 3: Webinar Content and Presentation Preparation

Great technology means nothing without compelling content. This phase covers how to structure your webinar for maximum engagement.
How should you structure a webinar for maximum engagement?
Great presenters keep attendees involved throughout the session by using interactive webinar engagement strategies rather than relying on slides alone.
A well-paced webinar follows a clear arc. Here’s a structure that works well for 45–60 minute sessions:
- Welcome and housekeeping (2–3 minutes): Introduce the format, how Q&A works, and what attendees will leave with.
- Presenter introduction (1–2 minutes): Establish credibility quickly—attendees need a reason to keep listening.
- Hook (3–5 minutes): Open with a surprising stat, a relatable problem, or a bold claim that frames the rest of the session.
- Core content (25–35 minutes): Deliver your main teaching points. Aim for three to five key takeaways. Break the content with polls, examples, and questions to maintain attention.
- Q&A (10–15 minutes): Prioritize questions that add value for the entire audience, not just the individual asking.
- Close and CTA (2–3 minutes): End with a single, clear next step for attendees.
Slides should support what you’re saying, not repeat it word for word. Use visuals, short bullet points, and data visualizations to keep the deck engaging.
Phase 4: Webinar Marketing and Promotion Checklist
Even the best webinar fails if no one shows up. Most organizers underestimate how much promotion is required—and how early it needs to start.
How far in advance should you promote a webinar?
For most B2B webinars, a three-to-four week promotional window is optimal. This gives your audience enough lead time to register and block their calendars, without the event feeling so far away that they forget about it.
Webinar promotion checklist
4 weeks out:
- Landing page live with registration form
- Email announcement sent to your list
- Social media posts scheduled across relevant channels
- Speaker or partner co-promotion agreed upon
- Paid promotion (if applicable) set up and running
2 weeks out:
- Reminder email sent to non-openers and non-registrants
- Social posts featuring speaker spotlights or content previews
- Internal teams notified (sales, CS) so they can invite contacts directly
1 week out:
- Registration reminder email to full list
- Final paid promotion push
- Confirmation email resent to all registrants
24–48 hours out:
- “Last chance” email to non-registrants
- Reminder email to registrants with join link
Day of:
- Morning reminder email with direct join link
- 15-minute pre-start reminder (automated via platform)
Registration rates typically peak in the final week before an event, so don’t reduce your promotion efforts as the date gets closer.
Phase 5: Live Webinar Hosting Best Practices
You’ve done the preparation. Now it’s time to deliver.
What should you do on the day of a live webinar?
Before you go live:
- Log in 30–45 minutes early
- Confirm all panelists are present and audio/video are working
- Silence all notifications on your device
- Have a moderator managing chat and Q&A separately from the presenter
- Keep water nearby—presenting dries out your voice quickly
During the webinar:
- Start on time. Waiting for latecomers signals disrespect for attendees who arrived punctually.
- Acknowledge the audience early. A quick poll in the first two minutes increases engagement throughout the session.
- Pace yourself. Most presenters rush. Slow down, pause after key points, and check in with the audience regularly.
- Assign a dedicated moderator to handle technical issues and Q&A without distracting the main presenter.
Engagement techniques that work:
- Launch a poll within the first five minutes
- Use the chat feature to prompt responses during key points
- Call out attendee names when addressing their questions
Phase 6: Post-Webinar Follow-Up Process
The webinar ending is not the finish line—it’s the starting point for conversion.
What should you do after a webinar to maximize ROI?
Send your follow-up sequence within 24 hours while the session is still fresh. A typical post-webinar email sequence includes:
- Thank you email (sent same day): Thank attendees, include the recording link, and share any promised resources.
- Miss you email (sent to no-shows): Brief summary, recording link, and a soft CTA.
- Follow-up nurture email (sent 2–3 days later): Additional value, related content, or a direct offer based on the webinar topic.
Beyond email, review your event data. Key metrics to analyze:
- Registration-to-attendance rate (industry average: ~45–50%)
- Engagement rate (polls answered, questions asked)
- Drop-off points in the recording (where did people leave?)
- CTA conversion rate (how many attendees took the next step?)
Use these insights to improve your next event. Even small adjustments—like changing the start time or restructuring the first ten minutes—can meaningfully improve results.
Common Webinar Planning Checklist Mistakes to Avoid
Even the best webinar planning checklist can fail if common mistakes are overlooked. Many organizers wait too long to start promoting their event, skip technical rehearsals, or overload presentations with too much information. Other frequent mistakes include ignoring audience engagement, failing to assign moderator responsibilities, and neglecting post-webinar follow-up. Reviewing these potential issues before every event helps ensure a smoother experience for both presenters and attendees.
Webinar Planning Checklist Timeline
A structured timeline makes any webinar planning checklist easier to execute. Start planning four weeks before the event by selecting your topic, speakers, and webinar platform. Three weeks before, launch your registration page and begin promotions. One week before, complete rehearsals and send reminder emails. On the event day, perform final technical checks, and after the webinar, send recordings, follow-up emails, and analyze performance metrics.
Your Webinar Is Only as Good as Your Preparation
Running a high-performing webinar is a repeatable process, and this webinar planning checklist gives you the framework to execute every event consistently. Every item exists for a reason: missed steps compound, leading to a frustrating experience for attendees and a missed opportunity for your brand.
Start with your next event and work through each phase of this webinar planning checklist systematically. As you host more webinars, you’ll develop reusable templates, refine your promotion strategy, and build a reliable production process that scales.
The first webinar takes the most effort, but by following a proven webinar planning checklist, every event after that becomes easier, more efficient, and more successful.
Frequently Asked Questions
How long should a webinar be?
Most webinars perform best between 45 and 60 minutes. This includes content delivery and a Q&A session. Sessions under 30 minutes often feel rushed, while those over 90 minutes risk significant audience drop-off. Match the length to the depth of your content, not the other way around.
How many speakers should a webinar have?
One to three speakers is the sweet spot. A solo presenter keeps things focused but can feel one-dimensional. Two presenters—a host and a subject matter expert—creates natural dialogue and maintains energy. Beyond three speakers, logistics become complex and audience attention can fragment.
What is a good webinar registration-to-attendance rate?
According to ON24’s 2023 Webinar Benchmarks Report, the average live attendance rate is approximately 45–56% of registered attendees. Sending a reminder email 15 minutes before the event starts is one of the most effective tactics for improving this rate.
Do you need a paid webinar platform to host a professional event?
Not necessarily. Tools like Zoom (with a Pro or Webinar plan) offer professional-grade features at a relatively low cost. The most important factors are reliability, registration management, and the ability to record. Free tiers from platforms like Streamyard or Demio can work for smaller audiences, though they typically come with branding limitations.
How do you increase webinar attendance after registration?
Send at least three reminder emails: one a week out, one the day before, and one 15 minutes before the event starts. Including a personal, direct join link in each email—rather than requiring attendees to log in—removes friction and meaningfully improves show-up rates.


No Comments